Install Dawbrain
Works with Ableton Live 12 on macOS and Windows, Intro, Standard, and Suite. About a minute: run the installer or one command, then pick Dawbrain as a control surface in Live.
Open this page on the Mac or Windows PC that runs Live. The install happens there.
Want to see it working first? Watch the nine-minute walkthrough, a full session built from a chat box.
Install in four steps
- 01
Create your free account, Google, Apple or email, no card. The install then ends in a single Authorize click. Already have one? Sign in.
- 02
Install Dawbrain on the computer that runs Live.
macOS
Download the installer and open it:
Download for macOSDawbrain.pkg, 48 MB, Apple silicon and Intel. Notarized by Apple. No admin password needed.
Or open Terminal and run:
curl -fsSL https://dawbrain.com/install.sh | bash
Windows
Download the installer and run it:
Download for WindowsDawbrain-Setup.exe, 33 MB, signed. If SmartScreen warns, click More info, then Run anyway. No admin password needed.
Or open PowerShell and run:
iwr https://dawbrain.com/install.ps1 | iex
The installer leaves no app to open: Dawbrain starts with Live, in the next step. There's no VST, AU or Max for Live device to install, and no API key to paste. Inference is included.
- 03
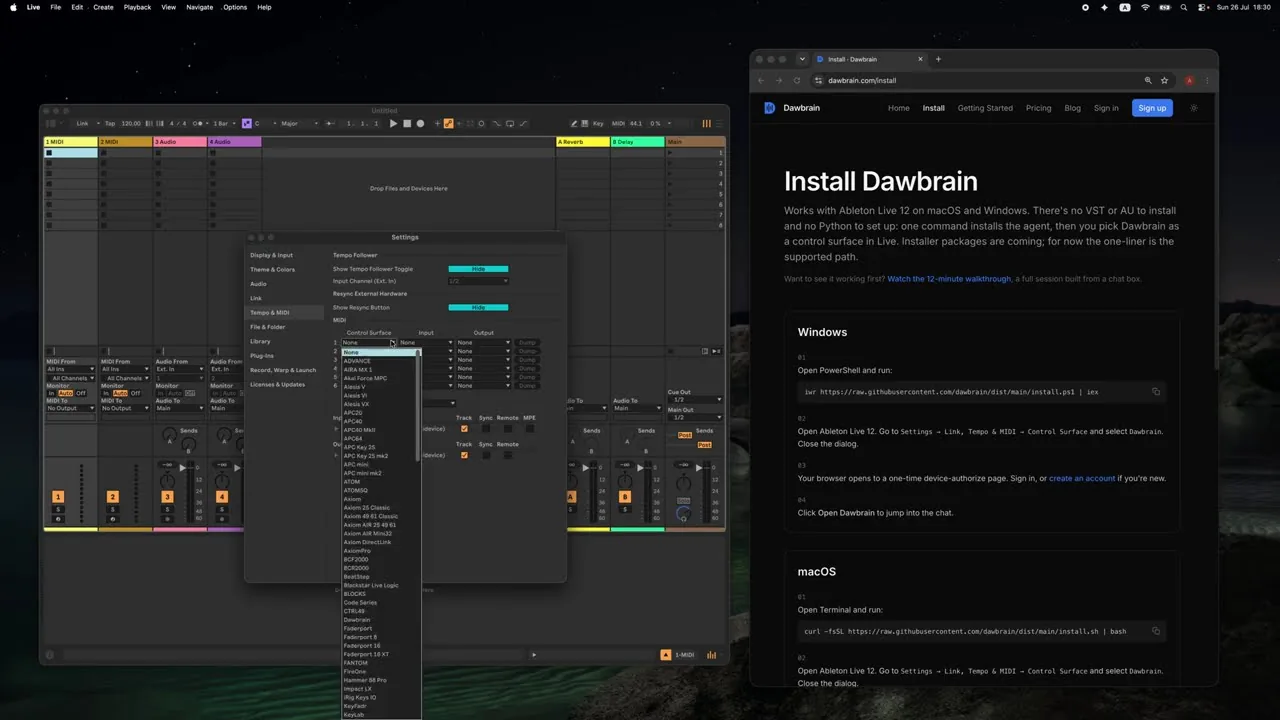
Open Ableton Live 12. If it was already open, quit and reopen it: Live only looks for control surfaces when it starts. Go to Settings → Link, Tempo & MIDI → Control Surface and select Dawbrain. Close the dialog.
- 04
Your browser opens a tab to authorize this computer. Click Yes, authorize this machine. Dawbrain is ready in the app tab you started from; if you have none, the page offers to open one. If you skipped step 1, the tab asks you to sign in or create an account first.
Watch the install
54 seconds, start to finish, on the Terminal route: the install command, then picking Dawbrain as a control surface in Live. The installer ends in the same place.
Troubleshooting
- Dawbrain isn't in my Ableton control surface list
- Live only looks for control surfaces when it starts, so if Live was open while the install ran, quit and reopen it. If it is still missing, check that you're on Ableton Live 12.
- The macOS installer says "The installation failed"
- The reason is in ~/Library/Logs/Dawbrain/install.log. The usual one is a missing User Library, covered below. The Terminal command is the same install and shows the reason on screen.
- Windows says "Windows protected your PC"
- The installer is signed, but SmartScreen can still warn about a download it has not seen many times yet. Click More info, then Run anyway. The PowerShell command is the same install without that dialog.
- The install says "Ableton User Library not found"
- The install uses the User Library set in Live, under Settings, Library, Location of User Library. If you have never opened Live on this computer, open it once so it creates the folder, then run the install again, the installer or the command. If your User Library is on an external drive, connect the drive first.
Uninstalling
The uninstaller won't run while Live is open. Quit Ableton Live, then run the command for your platform. On Windows, if you used the installer, Dawbrain is also listed in Apps & features, and removing it there is the same uninstall. On macOS the command is the uninstall whichever way you installed.
macOS
curl -fsSL https://dawbrain.com/uninstall.sh | bash
Windows
iwr https://dawbrain.com/uninstall.ps1 | iex
That removes the Dawbrain app, its control surface in Live and your local sign-in. Your Live sets, projects and User Library are untouched. Afterwards, if Dawbrain is still selected under Settings → Link, Tempo & MIDI → Control Surface, set it to None.
Uninstalling removes the software, not your account. A paid plan keeps running until you cancel it. See plans and billing.
Not sure what to try first? See the Getting Started guide.